This will be EPIC, so pay attention, and hopefully I'll help you figure this out as well as I have. I have a few prerequisites when it comes to vinyl record bags.
1- I don't want to cut or bend them. That takes way too much effort considering all the sewing.
2- I don't want to glue anything. I feel like glue can go wrong in so many situations. Also, I'd like to have the option of washing the bag.
3- I don't want the record to be an intrinsic part of the bag's adhesion. Why should I lose the bag if one or both sides break?? I should at least be able to replace a side.
INGREDIENTS: (if I omit anything, it will be mentioned later)
Two 33 1/3s, or two 78s, or two 45s, or two CDs
Ruler, Tape Measure, Button or Shaker Top, Scissors, Calculator, Pen/Pencil, Marker
Sturdy Fabric (less than half a yard), Iron, Zipper/Alternate Closure, Sewing Machine, Thread and Full Bobbin, Contrasting Thread, Large Sewing Needle, Thimble, Correction Liquid, Small Binder Clips
Two Drapery Pin-on Hooks, Candle, Newspaper, Pliers
O Rings, D rings, other optional embellishments
All of this will be done without pattern paper, because I know you're ready for some amazing seat-of-your-pants thrills.
READY??
Lay your fabric right-side down on your table. Trace your disc with the shaker top. Whatever the distance is between the hole in the shaker top and the actual disc will be the seam allowance on the circle ONLY. WRITE IT DOWN FOR LATER.

Pin the template fabric to another piece the same size, then cut out the circles.


Awesome. Epicness has begun. Set your discs aside for tomorrow. That's probably when you'll actually touch them again.
Grab your marker or felt-tip pen. Fold one of the circles in half so the right sides are touching. Mark the fold JUST AT THE TIP of the circle. Keep folding in half until you have 16 marks.


Repeat with the other circle.

Get your tape measure and write down the DIAMETER of one of your circles. Multiply by pi (3.14), and round down to the nearest 1/2 inch for the wall circumference. I'm so serious about this; if you do perfect decimals, you'll wind up with frumpy edges, so just round down.
This is where it gets funny: measuring the cavern, or the cylinder between the circles. All of your seam allowances should be about 1/2", so we want to really be precise about our cavern. I'm doing this with a zippered ceiling, but you can just do a binding-border opening. Let's say your circumference is 35", which it shouldn't be, because that's crazy. But theoretically speaking, if it were 35", and your ceiling was 14", you will subtract 14 from 35 and add one inch to both the ceiling and the floor.
So technically, you'd be using 15" of fabric length for the ceiling, and 22" of fabric length for the floor.
As far as width, I find that 3" is too hard to attach the discs later, and 5" is kind of bulky for me. 4" is perfect for 33 1/3s, so use discretion.
Make sense? Feel free to ask me for a better explanation.
Let's start by making the floor a little more sturdy, without adding too much bulk. The polka dot will be the outside, and the solid blue will be the inside of the cavern.

Using basting spray, I tacked the two together with a strip of nylon tape in between. You can just use fusible interfacing if you want to.


It's okay if some of it peaks out. Make sure if you trim, only trim away the INSIDE fabric, NOT the outside fabric. Its the polka-dot that will show.

If you don't know how to sew a zipper, there are lots of handy tutorials on the intarwebz. Just make sure to press and topstitch the fabric so it's neat. Start with too-wide fabric, and trim to the floor width after.

YES! That's what we want to see! I'm getting so excited, aren't you?

Let's make some straps, yes? I find THE BEST way to do this is to start with smaller tubes and add the hardware, then slip in the longer straps later. Feel free to use whatever you think will work best for you.
My hardware is freaking weird, so we'll pretend I'm using D-rings.

Cut four rectangles to 3x5" and sew them right sides together the long way. If you've used a 1/2" seam allowance, when you turn them, they'll fit perfectly into 1/2" rings.

Pretend these go on the rounded edge of a one inch D-ring.

Splendific! Fishies!
Now, we want to combine the hardware, the ceiling, and the floor. First, lay the ceiling on your table wrong side down, then pin your hardware loops. Mine are pinned as such to minimize bulk and to just look really cool in the end.

Next, lay your floor wrong side up on top of that, and pin it all together as well.


ZOMG! Okay, put it aside, we'll sew it when we sew on the pockets!
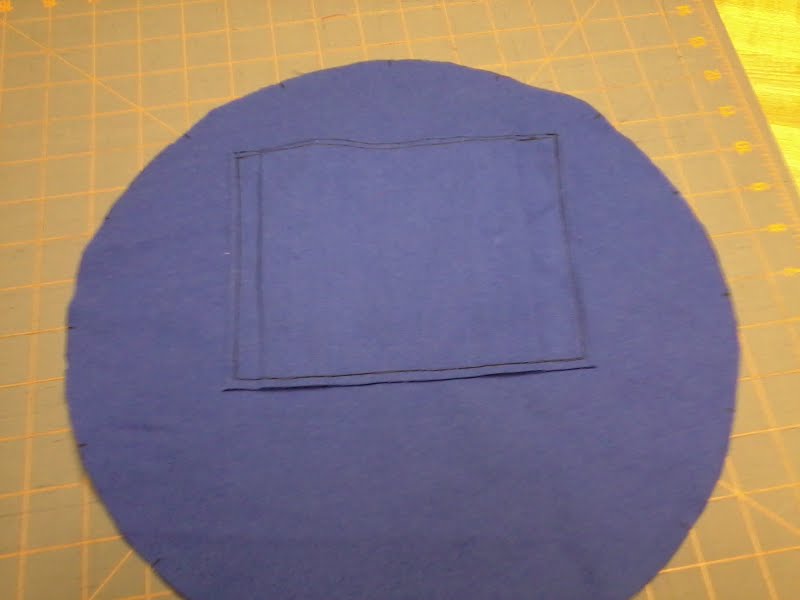
Pockets are a fun addition to this bag because nobody likes to dig around the bottom for tiny things. I'll add two pockets to this bag, but you can decide what yours will look like.
Remember to sew your pocket to the WRONG SIDE of the circles, because the right side touches the disc, and therefore hides the stitches, as well.
And don't be silly with your pockets; yes, when the bag is naked, it seems like there's lots of space in the pocket, but when it's stuck flat, will you be able to put items in and get them back out? To make things a little easier on yourself, cut your pockets on the bias and zigzag stitch them to the circles, just in case.
Remember the marks we made on the circles? 2-4 of them will definitely be running with the grain. Choose one of these to be your Positive Top, and line your pockets up in relation with it so the pockets don't end up crooked or wonky.
This pocket is kind of cargo-y, and expands when it's full. I ALWAYS put one of these in my record bags, they save space.

The second pocket is partly pleated to hold a pen and partly flat for the matching mini wallet.


And also, sew your cavern together!


Wowowow! We're about 2/5 done! Go to sleep, it's probably late and you're tired!
Next Day:
Now, what you want to do is fold the cavern in half to find its Positive Top and Positive Bottom and make marks the same way you did to the circles. Do this 16 times on each edge so you'll have a way to match the cavern to the circles. If you can't see marks, you can use some corrective liquid (white out).

Pick up a circle, and, starting with the Positive Top, begin pinning the marks to their respective mates. Make sure the cavern is inside-out and that the pocket on the circle is facing up. Pin in between the marks, mating the cavern to circle neatly as you go. Sometimes they slip a bit or don't seem to match, but because the circle has bias edges, you can stretch a little here and there to get it centered.

Once again, make sure the pocket is facing you. Catch your mistakes fast, because ripping a seam out of a circle is a freaking mess.
Sew with that seam allowance we talked about at the beginning, the special one only for the circle. I know you can do it!! Take your time and adjust to avoid puckering.

Let's cheat a little and see how spot-on we were. Pick up a disc and drop it into the cavern. It should fit perfectly.


Yes! This is going to work!
Okay, back to the laundry. Open your zipper about two inches, and repeat the pinning with your second circle. Remember Positive Tops and Bottoms!


Luscious!
If you want to finish your edges, this is the time to do it. Also, clip all of your thread strands and make it neat and tidy inside.
Turn the new cavern outside out and smile REALLY, REALLY HARD!


Time to finish those straps!
You can use what you like for these, but I'm going to cut some non-bias binding from matching fabric. Why non-bias? Because I want minimal stretching going on in my straps.


Always good to press open seams on tubes before you turn them.
Loop your straps into the other end of the hardware, and sew them down. I used a zigzag overedge.


Aha! The "bag" part of the bag is finished! Trim every thread and sweep up your stitchy mess. No more fabric to worry about. You're 3/5 done!
Now comes the serious damage. If you haven't decided which records you want to use, this is the time. Go with something that reflects your personal style. Go true to your fabric's era. Go ballistic. Whatever you do, go big or go home.

This is "The Music of Broadway" Volumes 1 and 2. I LOVE My Fair Lady, and I know alllllllllll the songs to Flower Drum Song. I'm totally going big with these.
Decide which sides will be your fronts and backs. I almost always go with Side 1 as the front, but it's up to you. Whichever side is NOT your front, mark a few Xs on the label so you know where you left off.
Now is when you'll need a ruler and one of the curtain hooks. Alternately, you can use a seam ripper.
Find the Positive Top and Bottom and scratch (I know, this hurts Vinyl Aficionados) a line on the lead-in. This is the very edge of the vinyl where there are only two or three grooves. Start with 8 marks, then gradually increase to 24 by making two centered marks between each 8th mark. You can go as high as you want; more holes mean a sturdier frame, but more holes also mean more stitching. All you really want to do is have an even number of stitches.


Now to punch the holes. If you don't know how to do this, refer my video HERE. The tool I'm using this time is made the same way, but with an unbent curtain pin-on hook. It's more thick than a safety pin or paper clip. Light your candle, and have your pliers ready to clean off the gunky residue. And open some windows for goodness sake.


Start going crazy! Okay, not really. But after punching a few holes, you'll develop a good rhythm. Put some music on and get a system, like "Flame, two-three-four, punch, two-three, pull". Just an idea. Remember that when you pull the metal out, you'll leave a plastic pile on that side of the album, so always punch into the wrong side so the front stays clean and smooth.


When you've finished punching both discs, use the pliers to pull of the plastic piles and sweep away the bits and pieces of everything. Blow out the candle, dip the punch tool in the wax to keep it from stabbing anybody, and clean up your area. You're 4/5 done!
This is where the going really gets tough. Find a few good movies, because this is what will seem to take the most time. Turn the volume up high, because cursing is almost definite.
Unzip your bag, find the Definite Top and Bottom of one side, and line up the vinyl with those marks. Use the binder clips to sandwich the fabric circle BETWEEN the seam allowance and the vinyl. YOU WANT TO SEW THE SEAM ALLOWANCE DOWN. Obviously, you're not sewing the outer part of the bag to the inner part, that's why we took such accurate measurements, but until you get there, you want everything to stay somewhat stationary.
Thread your large needle with the contrasting thread of your choice, and thread it double or quadruple. You want to be sewing a strand of either four or eight threads into the vinyl for this step. Trust me. The length of these four threads should be able to go around the circumference of the bag once, plus six inches.
Prop the open bag on your hand. If you're left-handed, prop it on your right hand and plunge the needle with your left hand, starting on the left side of the bag. If you're right handed, prop it on your left hand and plunge the needle with your right hand, starting on the right side of the bag.
Or do what feels comfortable.
Whichever way, start with a hole that lands just before the zipper ends and the straps begin. From the inside of the bag (hopefully you've knotted the end of the thread), sew through the seam allowance, the circle, and then the vinyl. Pull alllllllll the way through. Plunge into the hole above that, through the circle and then the seam allowance. Catch the needle inside, and find the next hole above, sewing through the seam allowance, the circle, and the vinyl. Catch the inside thread with your thumb, and gently but firmly pull the needle end until you've tightened the outer loop of thread, then the inner loop of thread.

Basically, it's a running stitch, but you want nice, tight stitches. Continue around the vinyl, moving your binder clips as you go, until you have the whole disc secured once. You'll have excess thread when you finish, so start going the opposite direction, catching the gaps in the seam allowance you haven't gotten yet. Just before you run out of thread, and before you make it to the straps on the other side, knot and trim your thread. Re-thread your needle as you did the first time. This will keep you from trying to knot off your thread inside the freaking bag, which is a pain and really makes you want to kick yourself.
Repeat the securing step on the other side of the bag, knot off, and re-thread. Now, do your complete double-back on the first side, ending at your original starting place. Knot off, trim, and re-thread. Repeat on the other side, but no re-threading necessary.

If you really want to, you can secure your knots with some super glue, just in case.
AND YOU'RE DONE!!!!!!


Omigooniz! It looks so good!
Here are some others, the top two being my prototypes.
This is from CDs, with a slip opening.


This is from 45s, also with a slip opening, but with really funky silver fabric.


This is actually my everyday purse, with a binding-border opening instead of a zipper (a.k.a. always open) and a single strap.


This was commissioned, and upcycled from a broadcloth shirt.


I am SO in love with these bags, and I know there aren't many tutorials out there for them. So let me know how you feel about this one, and let me know if it works for you! I'm considering making templates for these, so you can print, cut, and sew, or kits, so all the measuring will be out of the way, and all you'd have to do is sew everything together. But I don't know who'd buy them.
Please feel free to comment with any questions!
I hate to measure so a template would be great. I would love to make one for my niece.
ReplyDeleteExcellent tutorial Can't wait to try this out. You rule.
ReplyDeleteI know I'm over a decade late to this party, but seriously, this is very helpful. I made one with records for a purse and a matching one with smaller record things (idk what they are called I'm from 2005) as a makeup bag. My girlfriend is going to love her Valentine's day gift. Thank you so much (:
ReplyDelete